Tag: difficult

  • Spring IoC, DI quick tutorial

    There has been an (evident) craze amongst Java community with contrived terms such as IoC (Inversion of Control), DI (Dependency Injection) mainly through Spring. I initially found the connotation “Don’t call me, I’ll call you” a bit difficult (yeah, it’s bending your head upside down) to understand, but after spending few hours around Spring documentation, I get the gist.

    To a layman (Java layman, of course) it is helpful to picture that each Java program is a set of one or more classes, which act together. Essentially, this means classes are “dependent” on some classes in order to be fully functional. Usually, the class requiring functionality of another class instantiates the class, and uses it. This is called coupling because class instantiates the object of required class. What if we always got an “instantiated” instance of required class, and our class did not have to worry of instantiation? – This is called IoC (Inversion of Control) principle in Spring, and it achieves this by providing ready-to-use instance (injecting dependency) to your class. This has some important uses, since now you don’t worry of creating connections to databases, loggers to log4j, or sessions for JMS queues. Spring will create these for you, and your class can focus on the actual purpose – using the pre-instantiated ready-to-use object.

    Get it? OK, to simplify it further, let us assume you have a class A having one field – log. You want to use log to log information, but your class nowhere has the logic to instantiate or initialize log. You accept a pre-instantiated log through constructor, or getter/setter methods, and you will have a ready-to-use log instance passed to your class via Spring!

    I won’t go into details of Spring further, since Spring’s own documentation on http://static.springsource.org/spring/docs/2.5.x/reference/index.html is the definitive source to look into.
  • Javascript sprite animations

    Javascript sprites weren’t as difficult as I thought. With a little bit of help, math, some css, js, images (of course) a decent animation can be shown without using any flash at all. I coupled it in a small class Animator, and wrote a small demo for anybody interested in using it.

    http://www.naiksblog.info/jsspriteanim/index.html

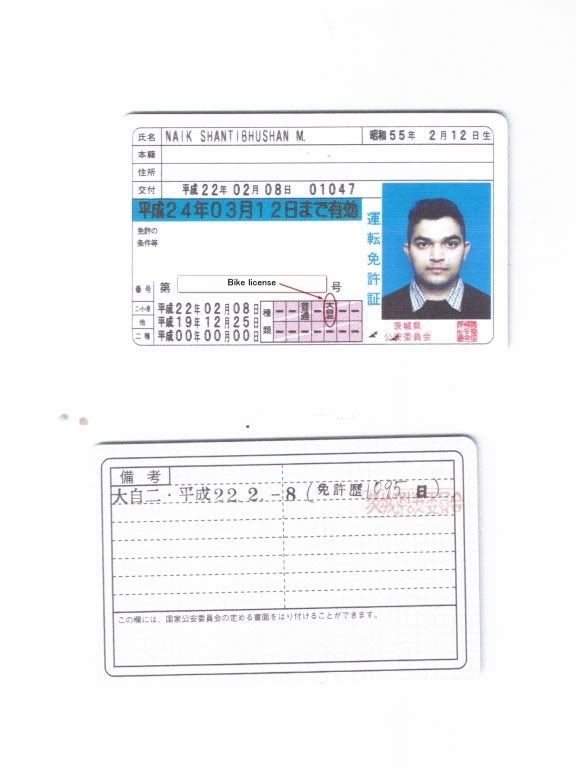
  • Got my bike license – 大型二輪免許を一発合格しました

    Hurray ! I received my bike license today in Japan ! In my first attempt itself ! Wish me congratulations !

    Bike license in Japan
    My bike license in Japan

    Ok some background – I had a bike license from my country. I had not converted it to International License, so I had to opt only for conversion into Japanese license – 外国免許切り替え. I do have a car license obtained in Japan, so I was exempted from written test (which by the way is too difficult, trust me). Instead, I simply had to appear an actual driving test (which is again difficult, mind you). I was required to produce a translated copy of my original license from my country, which can be done in 30 mins in JAF offices. Rest are your passport (both old, new ones), an application form, few stamps which you can buy right there. I live in Tsukuba, so I had to goto Ibaragi License Center, which is situated in Mito. You can go during weekdays, from 09:00AM. Believe me, you better arrive early. There is plenty of crowd, for all sorts of licenses, and usually you have to spend almost whole day there, in case you pass the test and obtain the license. I spent close fo 6 hours today, but in the end I was a happy guy.

    Once they receive your application, they ask you few questions about your original license – How did you obtain it? Where did you practice? What kind of test did you appear for this license? How many cc bike? Learner’s license? etc. Unless there are any problems, you are then handed over a course map, and timings when your test will start. Mind you, the course map is given so that you “memorize” it, period. You are required to drive the exact course map, observing lane rules, traffic signs, signal, right or left indication, speed or slow. The usual advice is that you have some 45 mins in hand before your test starts. Thus, you should actually take the course map in hand, and walk the entire course by foot atleast once. I did that, making a mental note of the lanes, the distance around which I should turn on the indicator, and so on – till I burnt the course map into my brain cells !

    The most difficult are – Ipponbashi, and Slalom – for me. And I did literally walk on foot imagining I was on bike before my test started.

    I believe I was the only one appearing a bike test today – why I was alone sitting in the waiting room till my turn came. The instructor was kind enough to walk me (verbally) through the course map once again. He also gave me a brief about the bike – Honda CB750 – and for my own safety, in case I should fall, had me wear elbow, knee, body protector before the test.

    When the actual test started, the instructor actually sits in a watchtower, from which he had a complete view of the course. Once he gave a go, I just drove the same path I had walked on foot earlier. I was particularly careful about slow down sign, lane change, and making sure that I move my head from left to right wide enough to show that I am taking visual confirmations before proceeding. At one point when making a turn I did step down, but I guess that was OK, because if I’d had done the same on Ipponbashi or Slalom, or even S-letter, or Crank, I am out without any further discussion. Phew, I did feel once the bike will stop during Crank, but I was lucky enough to make it till the final stop.

    In the end, the instructor appraised my driving skills, and gave me the golden word – “合格” !

  • Nicolas grows

    Getting hell of a lot busy these days with 2 children – Nicolas, and Amrita.

    Yep, that’s it. Some photos – Photos speak louder than words?